Pull external data into your register with OpenConnector
Feed your OpenRegister Pet Store from a live external API without writing integration code. You register the public Swagger Pet Store as a source, test the connection, write a Twig mapping that reshapes an external pet into your pet-academy schema and test it against a sample record, tie source, endpoint, results/id position, mapping and target register together in a synchronisation, run it for real to create pets in your register, and finally schedule it so new records arrive on their own — with id-based deduplication on every re-run. Pet Store domain, with UI, API and PHP tabs throughout.
OpenConnector is the integration engine for Conduction apps. Where OpenRegister stores the data you own, OpenConnector reaches out to data you do not — a case-management API, an open-data portal, a partner's REST service — and pulls it into a register on a schedule, reshaped to fit your own schema. It does this without a line of integration code: you describe where the data lives, how a record should be reshaped, and what should run, and OpenConnector does the fetching, the transforming, the writing and the deduplicating for you.
This tutorial fills the Pet Store register you built in Part 1 from a real, public, external API — the Swagger Pet Store. You register that API as a source, test it, write a Twig mapping that turns an external pet into a pet-academy object and test the mapping against a sample record, build a synchronisation that ties it all together, run it for real to create pets in your register, and schedule it so it keeps the register current. No code, no cron file, no glue.
You are in the middle of a full data pipeline, all in the Pet Store domain:
- Model your data with OpenRegister — design the schemas and store records.
- OpenConnector (you are here) — feed the register from an external API on a schedule.
- Publish a public catalog with OpenCatalogi — expose the register as an open, harvestable catalog.
Each tutorial stands on its own, but together they take a record from "modelled" to "public". This part assumes the petstore-academy register and its pet-academy schema from Part 1; if you do not have them, run Part 1 first — it takes about half an hour.
Most steps below have three tabs — UI, API, and PHP — so you can follow the click-path, automate it with curl, or call OpenConnector's OCA\ services in code. The UI is the star; the API and PHP tabs show the same action as automation. One step (scheduling) is UI-only, and the tutorial says so when you get there.
The three pieces of an integration
Before clicking, hold these three words in your head. OpenConnector splits every integration into three objects, and you build them in this order:
- A source is where the data comes from: a base URL and how to authenticate. The Swagger Pet Store is a source.
- A mapping is how a record is reshaped: each field of your schema gets a Twig expression that reads from the external record. "An external pet becomes a
pet-academyobject" is a mapping. - A synchronisation is what runs: it pulls from a source endpoint, applies a mapping, and writes into a register and schema. It is the thing you run, and later schedule.
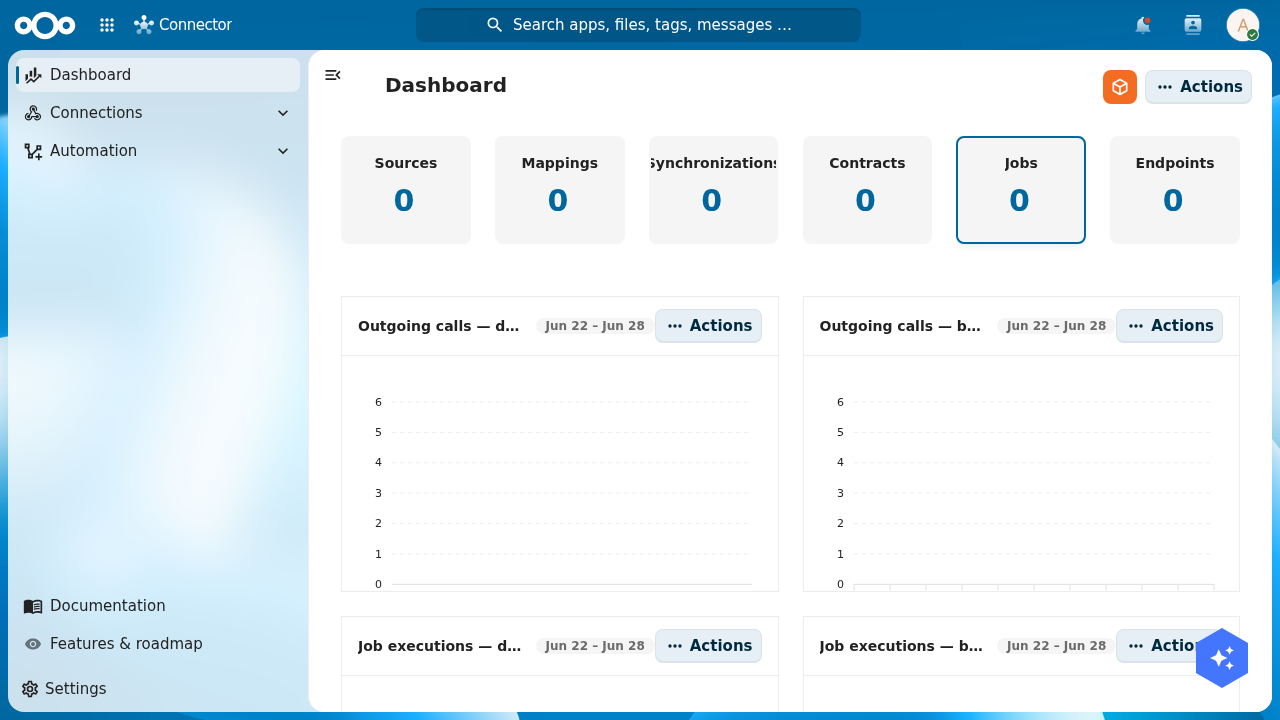
Open OpenConnector from the Nextcloud app menu. The dashboard counts each piece — Sources, Mappings, Synchronizations, Contracts, Jobs, Endpoints — and charts the outgoing calls, job executions and synchronisation runs over time. On a fresh instance every tile reads zero; you are about to make them count.
Step 1: Register the Swagger Pet Store as a source
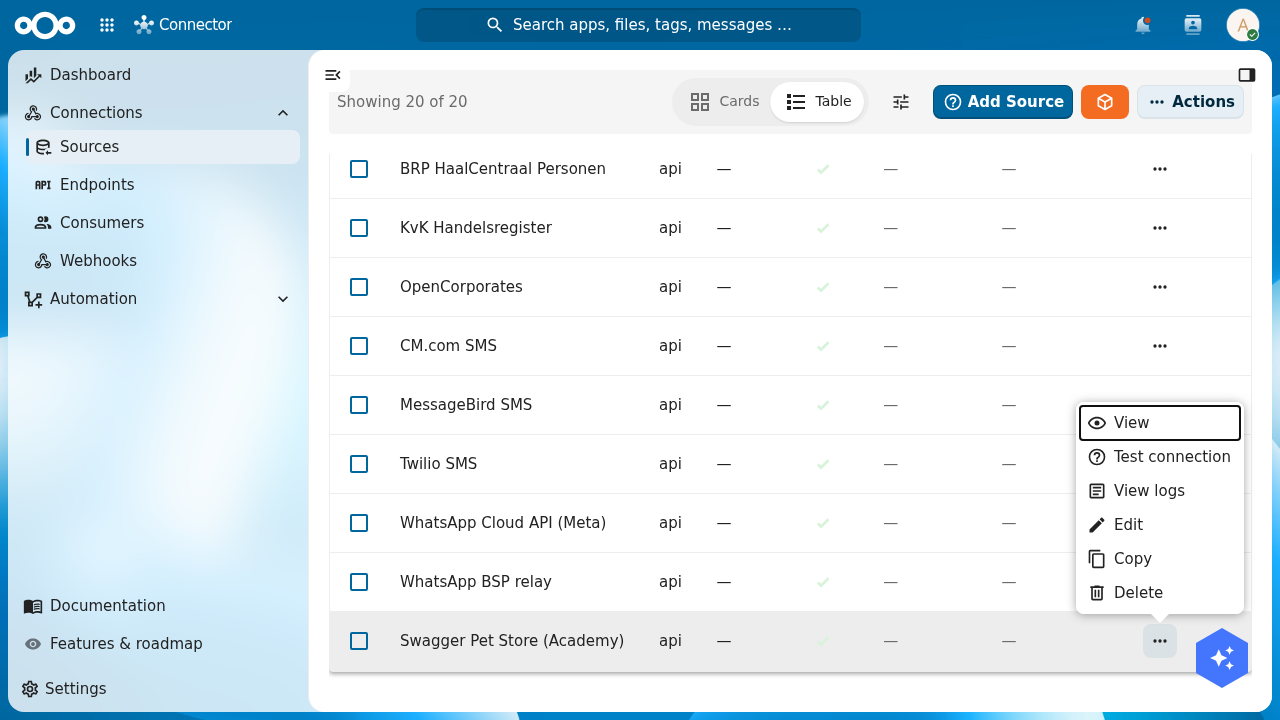
In the left navigation open Connections → Sources. This is the list of every external system OpenConnector knows about. The toolbar carries an Add Source button.
- UI
- API
- PHP
Click Add Source. The Create Source dialog asks for a name, a type, an optional description, and an isEnabled toggle (on by default). Name it Swagger Pet Store (Academy), set the type to api (the type tells OpenConnector's CallService which adapter to dispatch at runtime — api is plain HTTP), add a short description, and leave it enabled. Click Create.
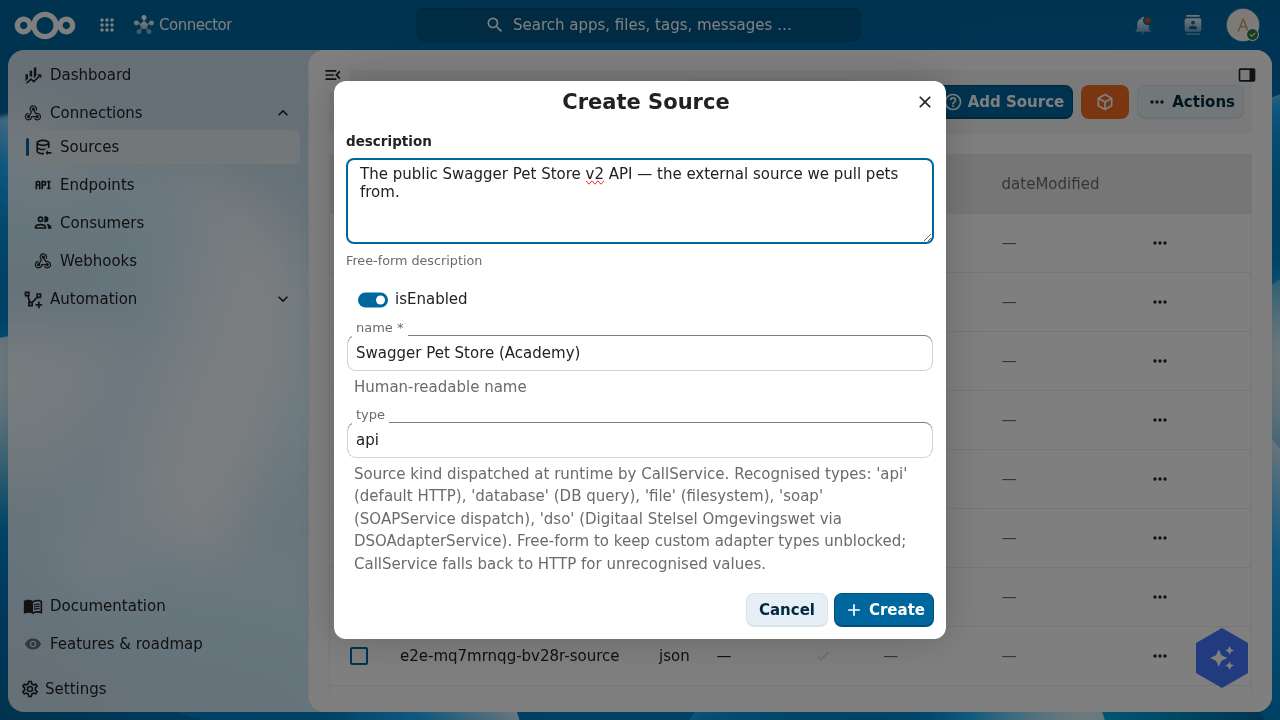
api), a description and the enabled toggle. The type is the runtime adapter; api is a plain HTTP source.Now give the source its location — the base URL it talks to. Open the source from the list (its Actions → View) and set the location to https://petstore.swagger.io/v2. This public API needs no authentication, so there are no credentials to add. The detail page shows the source's full record: location, type, isEnabled, and the auth, rate-limit and retention fields you would fill in for a real, secured source.
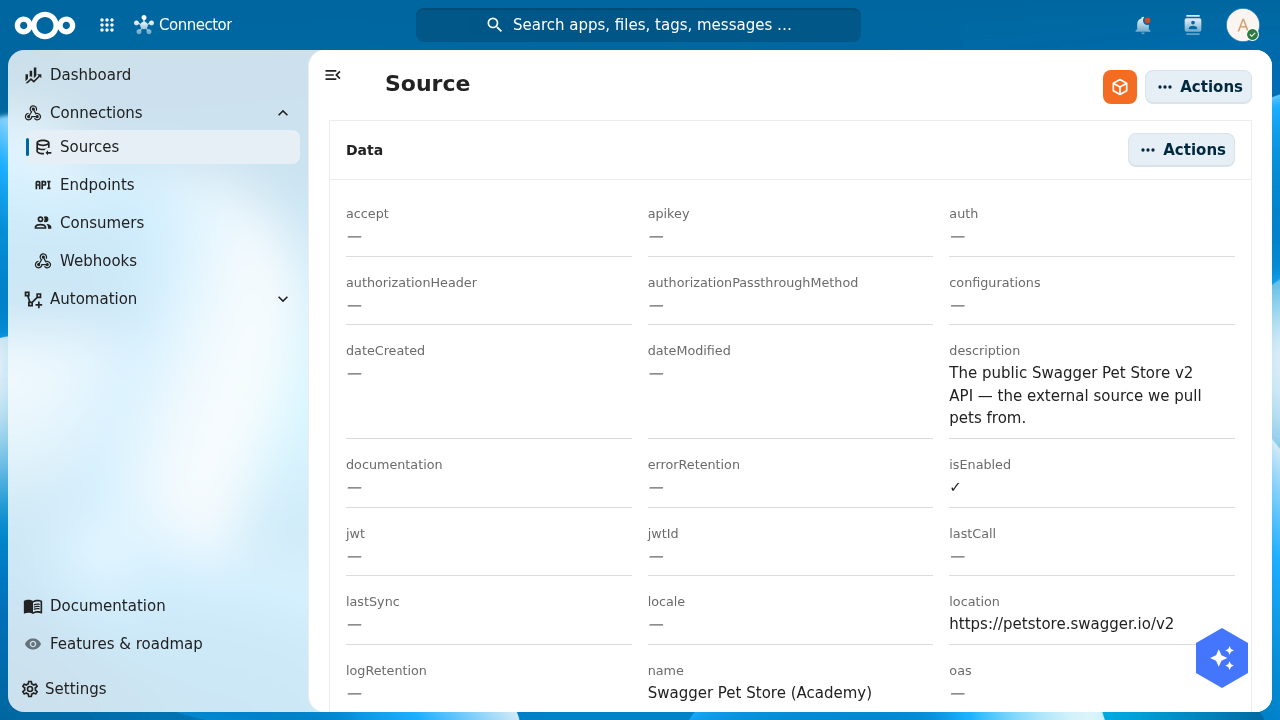
https://petstore.swagger.io/v2; the auth, credential and rate-limit fields stay empty because this public API needs none.Use the source's Actions → Test connection to confirm OpenConnector can reach the host. OpenConnector pings the source's base location and records the response. For the Swagger Pet Store the bare base path returns a server response (the host is reachable; the root simply has no resource of its own) — the real end-to-end check is running the synchronisation in Step 4, which calls an actual endpoint.
Host http://localhost:8080, basic auth admin:admin, and the header OCS-APIRequest: true on every call. Create the source with its location and type, then test connectivity with its id:
curl -u admin:admin -X POST "http://localhost:8080/index.php/apps/openconnector/api/sources" \
  -H "OCS-APIRequest: true" -H "Content-Type: application/json" \
  -d '{ "name": "Swagger Pet Store (Academy)", "type": "api",
        "location": "https://petstore.swagger.io/v2", "auth": "none", "isEnabled": true }'

curl -u admin:admin -X POST "http://localhost:8080/index.php/apps/openconnector/api/sources/test/<SOURCE_ID>" \
  -H "OCS-APIRequest: true"
The create response includes the source's id and uuid; keep them — the synchronisation references the source by its uuid.
A source, mapping and synchronisation are all OpenRegister objects in the openconnector register, so you create them with OpenRegister's ObjectService and test reachability with OpenConnector's CallService:
use OCA\OpenRegister\Service\ObjectService;
use OCA\OpenConnector\Service\CallService;

$objects = \OCP\Server::get(ObjectService::class);

$source = $objects->saveObject(
    object: [
        'name'      => 'Swagger Pet Store (Academy)',
        'type'      => 'api',
        'location'  => 'https://petstore.swagger.io/v2',
        'auth'      => 'none',
        'isEnabled' => true,
    ],
    register: 'openconnector',
    schema:   'source',
);

// Confirm OpenConnector can reach it by calling a real endpoint.
$call     = \OCP\Server::get(CallService::class);
$response = $call->call($source, '/pet/findByStatus?status=available');
Verify: Swagger Pet Store (Academy) appears in Connections → Sources with type api, and its detail page shows the location https://petstore.swagger.io/v2.
Step 2: Write the mapping
A mapping turns one external record into one object in your schema. The Swagger Pet Store returns pets as a bare JSON array; one record looks like this:
{
  "id": 9,
  "name": "doggie",
  "status": "available",
  "category": { "id": 1, "name": "Dogs" },
  "photoUrls": ["..."],
  "tags": [{ "id": 1, "name": "friendly" }]
}
Your pet-academy schema (from Part 1) wants name, species and status. The species is not a top-level field on the source — it sits inside the nested category object — so the mapping has to reach into it. Each target field is a Twig expression that reads from the source record:
pet-academy field | Expression |
|---|---|
name | {{ name }} |
species | {{ category.name }} |
status | {{ status }} |
- UI
- API
- PHP
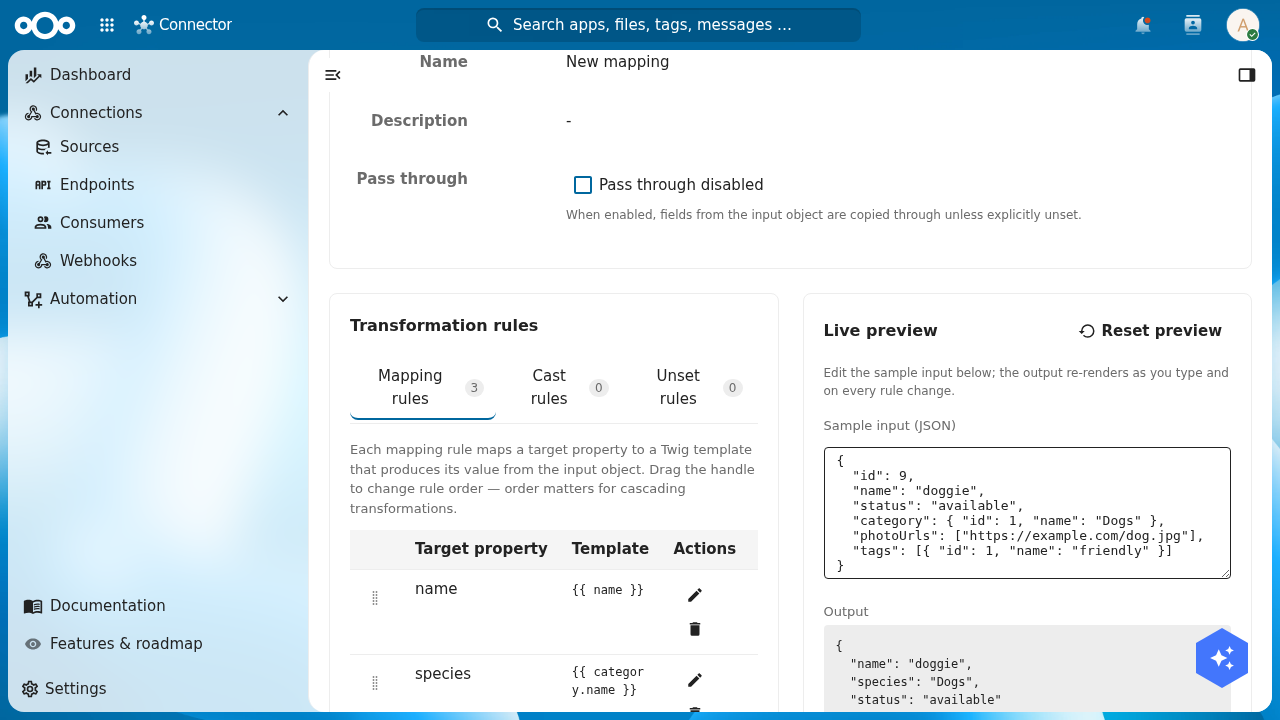
Open Automation → Mappings → Add Mapping. OpenConnector creates the mapping and drops you straight into its editor. The editor has a General section (name, description, and a Pass through toggle), a Transformation rules section with Mapping rules, Cast rules and Unset rules tabs, and a Live preview that re-renders as you work.
On the Mapping rules tab click Add mapping rule. A dialog asks for a Target property and a Twig template. Add the three rows from the table above — name → {{ name }}, then species → {{ category.name }}, then status → {{ status }}.
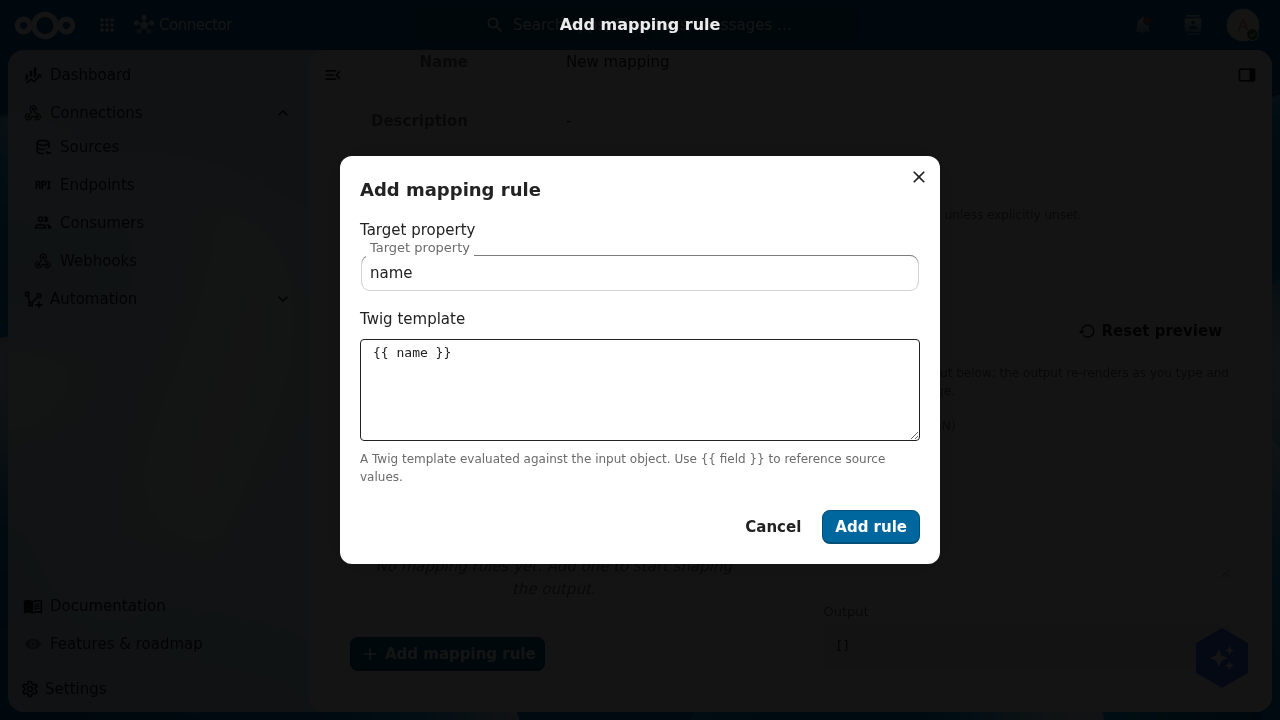
{{ category.name }} reaches into the nested category object for the species.Now the important toggle: turn Pass through off. With pass-through on, every field of the source record (its id, photoUrls, raw tags) is copied through alongside your three derived fields — handy sometimes, but here it would pollute your clean pet-academy object with source plumbing. Off, the output is exactly the three fields you mapped.
Paste a sample pet into the Sample input (JSON) box and watch the Output re-render live. With pass-through off and the three rules in place, the output is precisely what pet-academy expects:
{ "name": "doggie", "species": "Dogs", "status": "available" }
name, species and status — the live output updates as you type.Give the mapping a name — Pet to pet — and a description from the editor's General section (or rename it later from the mappings list). It now reads cleanly as the thing it is: a Swagger pet, reshaped into one of your pets.
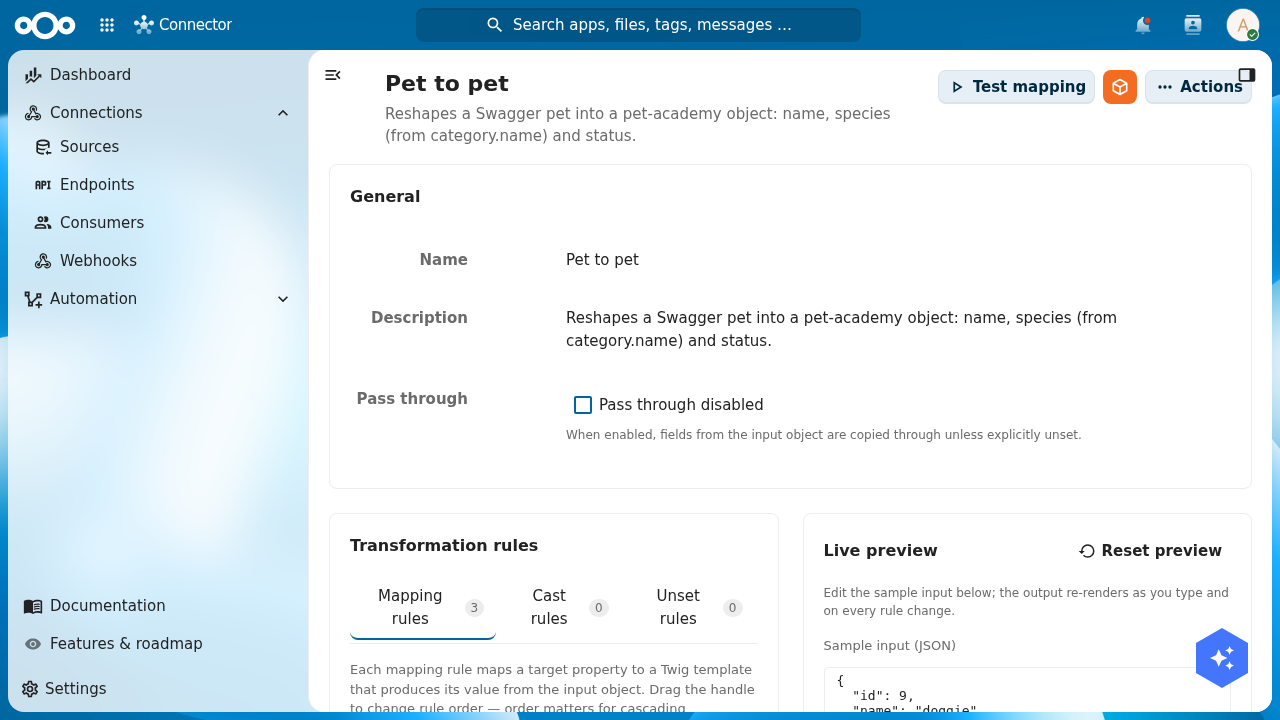
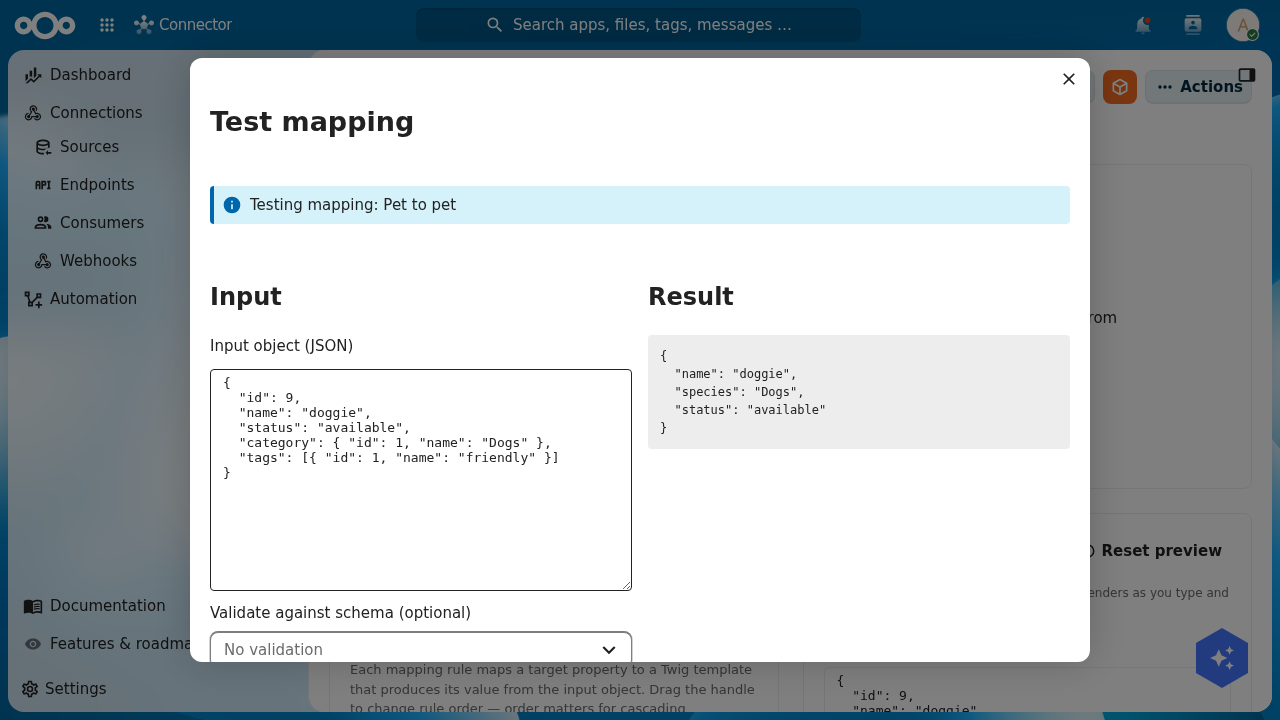
pet-academy object.Before you wire it into a synchronisation, run the mapping's Test mapping action. It opens a dialog where you paste an input object, optionally pick a schema to validate the output against, and click Run test — the Result panel shows the reshaped object, so you confirm the mapping does what you expect against a real record, not a guess.
A mapping is a name plus a mapping object of target field → Twig template. Turn passThrough off so only the mapped fields reach the target. Create it, then test it against a sample record:
curl -u admin:admin -X POST "http://localhost:8080/index.php/apps/openconnector/api/mappings" \
  -H "OCS-APIRequest: true" -H "Content-Type: application/json" \
  -d '{ "name": "Pet to pet", "passThrough": false, "mapping": {
        "name": "{{ name }}", "species": "{{ category.name }}", "status": "{{ status }}" } }'

curl -u admin:admin -X POST "http://localhost:8080/index.php/apps/openconnector/api/mappings/test" \
  -H "OCS-APIRequest: true" -H "Content-Type: application/json" \
  -d '{ "mapping": { "name": "{{ name }}", "species": "{{ category.name }}", "status": "{{ status }}" },
        "inputObject": { "name": "doggie", "status": "available", "category": { "name": "Dogs" } } }'
The test response is the reshaped object: { "name": "doggie", "species": "Dogs", "status": "available" }.
use OCA\OpenConnector\Service\MappingService;

$mapping = $objects->saveObject(
    object: [
        'name'        => 'Pet to pet',
        'passThrough' => false,
        'mapping'     => [
            'name'    => '{{ name }}',
            'species' => '{{ category.name }}',
            'status'  => '{{ status }}',
        ],
    ],
    register: 'openconnector',
    schema:   'mapping',
);

// Reshape one sample record to verify the mapping before wiring it up.
$mapper = \OCP\Server::get(MappingService::class);
$result = $mapper->executeMapping(
    $mapping,
    ['name' => 'doggie', 'status' => 'available', 'category' => ['name' => 'Dogs']]
);
// $result === ['name' => 'doggie', 'species' => 'Dogs', 'status' => 'available']
Verify: the Test mapping dialog (or the API test call) returns { "name": "doggie", "species": "Dogs", "status": "available" } for a sample Swagger pet.
Step 3: Create the synchronisation
The synchronisation ties the three pieces together. It needs:
- Source: the
Swagger Pet Store (Academy)source from Step 1. - Source endpoint:
/pet/findByStatus?status=available, the path appended to the source's location. - Results position: where the list of records sits in the response. The Pet Store returns a bare array, addressed as
_root. - Id position:
id, the field that uniquely identifies a record. OpenConnector keys deduplication on it. - Source → Target mapping: the
Pet to petmapping from Step 2. - Target: your
petstore-academyregister and itspet-academyschema.
- UI
- API
- PHP
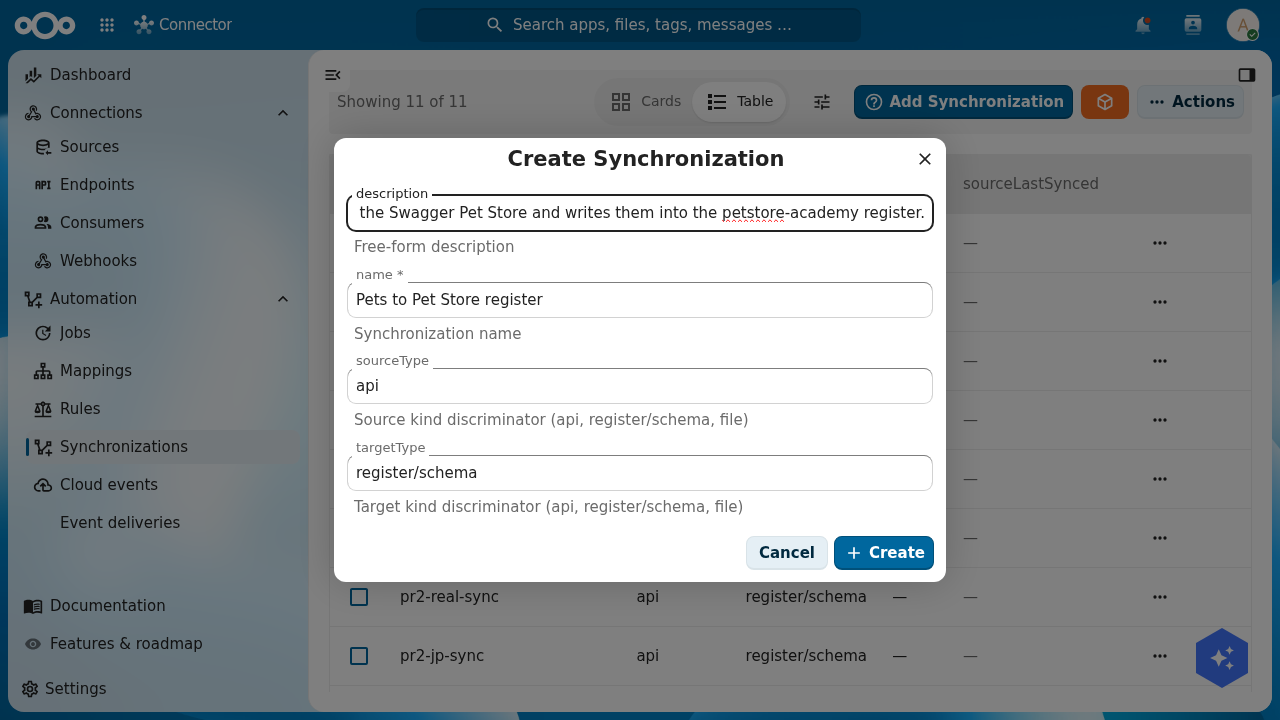
Open Automation → Synchronizations → Add Synchronization. The Create Synchronization dialog asks for a name, a sourceType and a targetType. Name it Pets to Pet Store register, set sourceType to api and targetType to register/schema, and click Create.
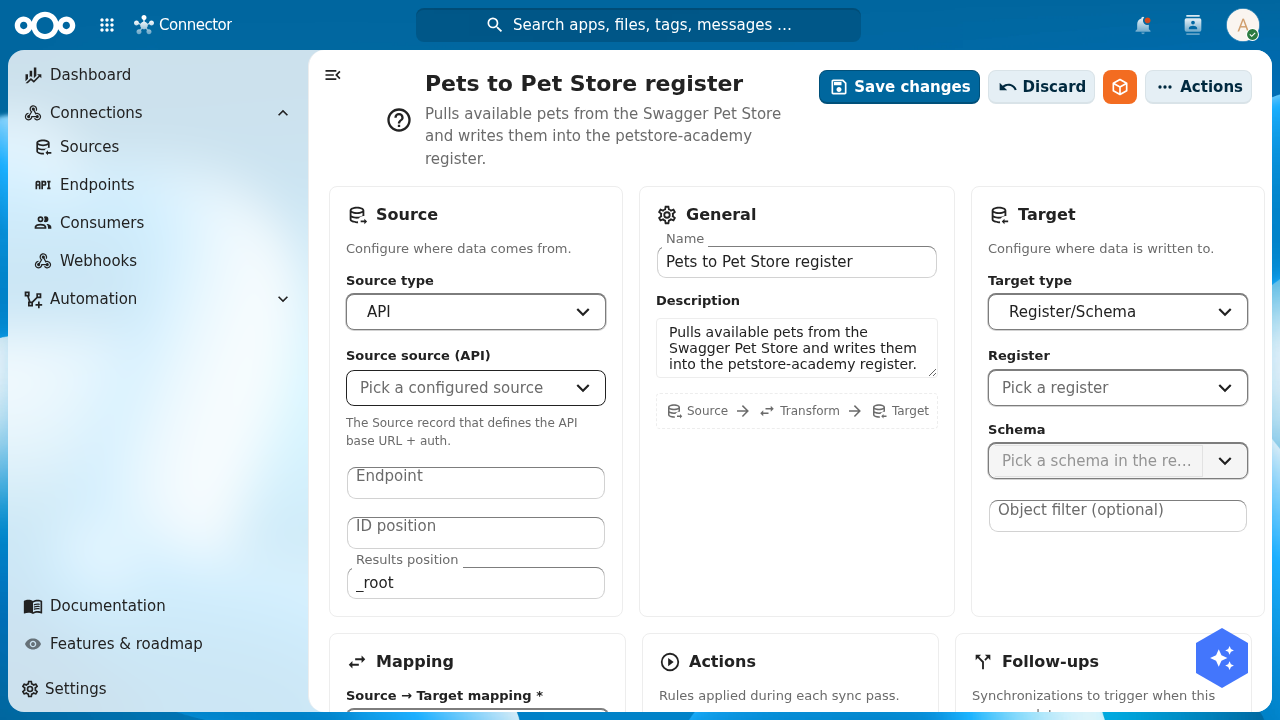
sourceType: api (pull from an HTTP API) and targetType: register/schema (write into an OpenRegister schema).Open the new synchronisation's Actions → Open editor. The editor is laid out in panels: Source (source type, the source record, endpoint, id position, results position), Target (target type, register, schema, an optional object filter), and Mapping (the source → target mapping, plus optional reverse and hash mappings). Fill them from the dropdowns and fields:
- In Source, pick
Swagger Pet Store (Academy), set Endpoint to/pet/findByStatus?status=available, ID position toid, and Results position to_root. - In Target, pick the Pet Store register and the Pet schema.
- In Mapping, pick
Pet to petas the Source → Target mapping.
Then Save changes.
Reference the source by its uuid, the mapping by its uuid, and the target as <REGISTER_ID>/<SCHEMA_ID> (here petstore-academy is id 2414 and pet-academy is id 4318):
curl -u admin:admin -X POST "http://localhost:8080/index.php/apps/openconnector/api/synchronizations" \
  -H "OCS-APIRequest: true" -H "Content-Type: application/json" \
  -d '{ "name": "Pets to Pet Store register",
        "sourceId": "<SOURCE_UUID>", "sourceType": "api",
        "sourceTargetMapping": "<MAPPING_UUID>",
        "sourceConfig": { "endpoint": "/pet/findByStatus?status=available",
                          "resultsPosition": "_root", "idPosition": "id" },
        "targetType": "register/schema", "targetId": "2414/4318" }'
$sync = $objects->saveObject(
    object: [
        'name'                => 'Pets to Pet Store register',
        'sourceId'            => $source->getUuid(),
        'sourceType'          => 'api',
        'sourceTargetMapping' => $mapping->getUuid(),
        'sourceConfig'        => [
            'endpoint'        => '/pet/findByStatus?status=available',
            'resultsPosition' => '_root',
            'idPosition'      => 'id',
        ],
        'targetType'          => 'register/schema',
        'targetId'            => '2414/4318', // petstore-academy / pet-academy
    ],
    register: 'openconnector',
    schema:   'synchronization',
);
Verify: the synchronisation's editor shows the source, endpoint /pet/findByStatus?status=available, results position _root, id position id, the Pet to pet mapping, and the Pet Store register and Pet schema as the target.
Step 4: Run it
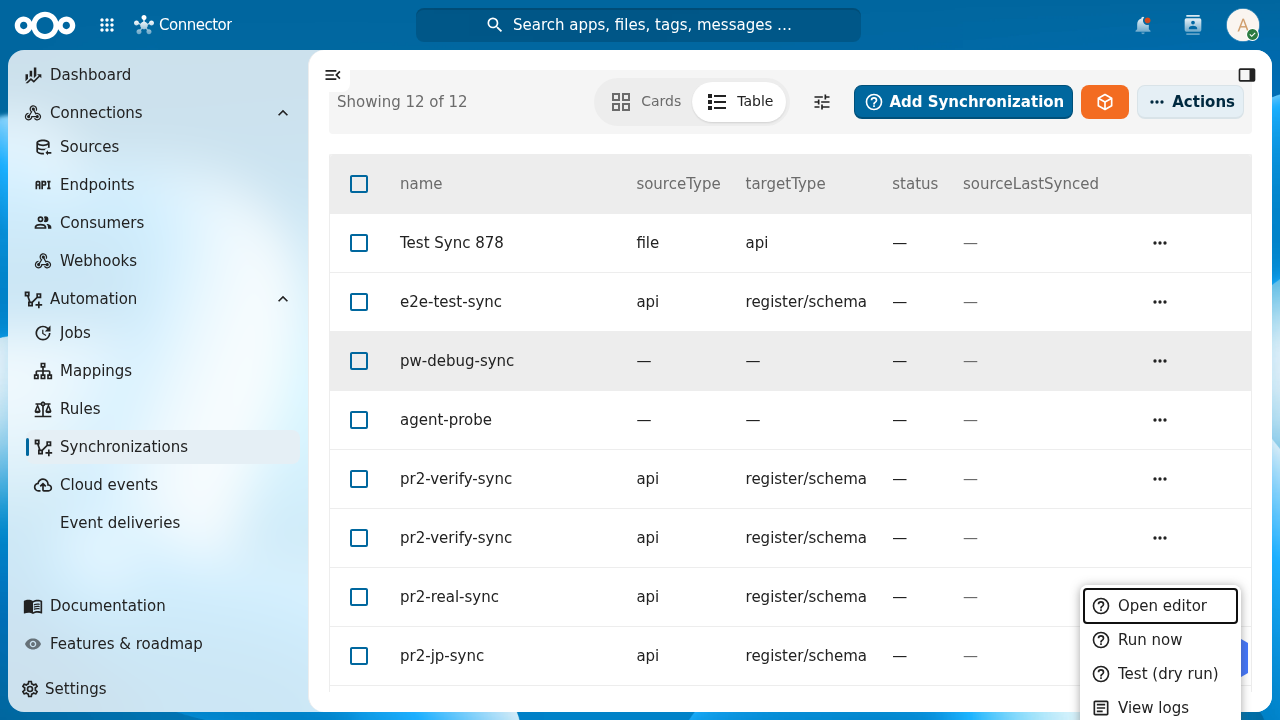
With the synchronisation configured, run it. From the Synchronizations list, open the row's Actions menu and choose Run now (the same menu offers Test (dry run), View logs and View contracts). OpenConnector fetches the endpoint, applies the mapping to each record, and writes the results into your register.
- UI
- API
- PHP
Run it with Run now. The run reports a result — how many records it read (found), and how many it created, updated and skipped. On a first run against your empty target, every found record is created. On our run the register went from the six pets you typed in Part 1 to ten: four new pets created from the Swagger source, no duplicates of the six you already had.
curl -u admin:admin -X POST \
  "http://localhost:8080/index.php/apps/openconnector/api/synchronizations/<SYNC_ID>/run" \
  -H "OCS-APIRequest: true"
The run returns a log shaped like { "result": { "objects": { "found": 4, "created": 4, "updated": 0, "skipped": 0 } } }.
use OCA\OpenConnector\Service\SynchronizationService;

$syncService = \OCP\Server::get(SynchronizationService::class);
$log = $syncService->synchronize($sync);
// $log['result']['objects'] === ['found' => 4, 'created' => 4, 'updated' => 0, 'skipped' => 0]
Now open OpenRegister → Data → Search / views, select the Pet Store register and the Pet schema in the sidebar, and the imported pets appear in the table — right next to Rex, Bella and the rest you created by hand in Part 1. The external records are now first-class objects in your register: searchable, versioned, permissioned, exactly like the ones you typed.
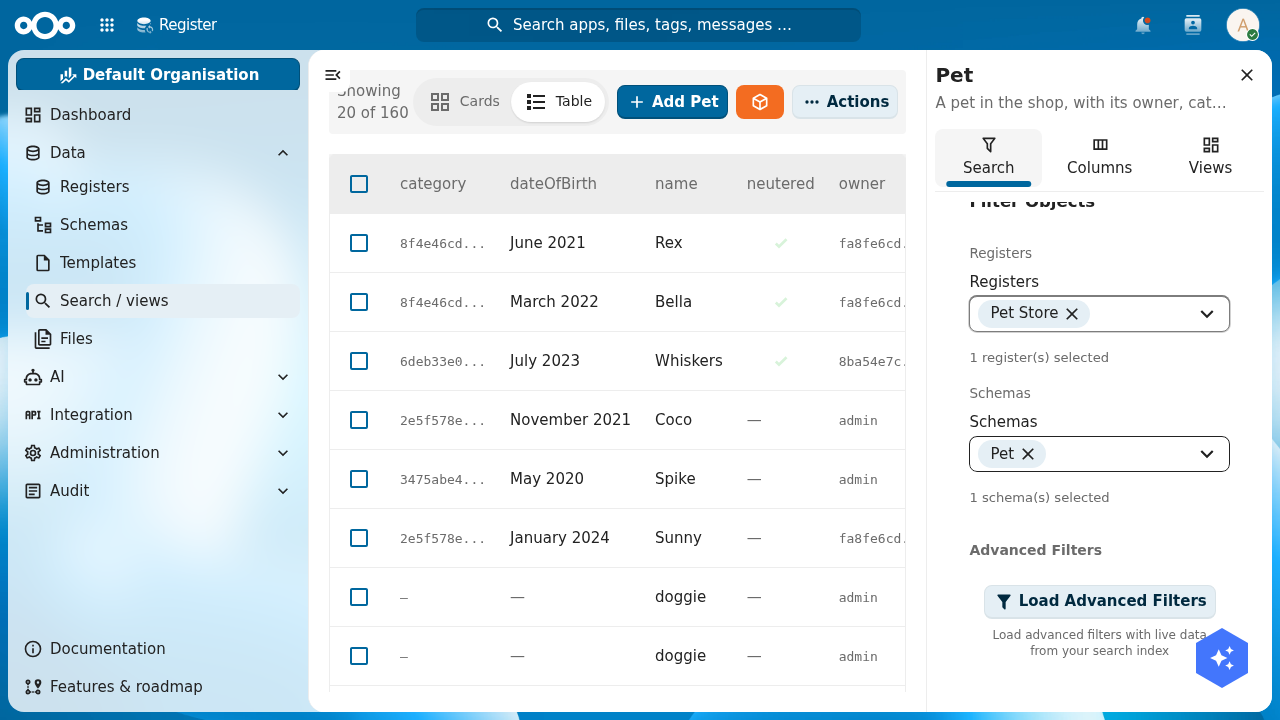
doggie records from the Swagger source sit in one table — the synchronisation wrote straight into your pet-academy schema.Verify: the run reports records created, and in OpenRegister's Search / views — scoped to the Pet Store register and Pet schema — the imported pets appear alongside the ones from Part 1.
Step 5: Schedule it
A synchronisation that runs once is an import. To keep the register current you schedule it, and OpenConnector registers a background job — its cron task runs the same synchronisation on the interval you pick. Open the synchronisation and set a schedule from its settings; from then on it runs on its own.
Scheduling is its own object (a job), so unlike the steps above it has no clean one-line API or PHP equivalent — create it from the UI. Once it exists, the Jobs tile on the dashboard counts it, and each execution shows up in the job-execution charts.
On every scheduled run, OpenConnector reads each record's id (the id position you set in Step 3) and compares it against what it already wrote — it keeps a contract linking each source record to the target object it produced. New ids are created, records whose content changed are updated, and unchanged records are skipped. The register tracks the source faithfully, and re-running never duplicates a pet you already have.
A daily open-data export does not need an hourly sync. Frequent runs against a slow or rate-limited API waste both sides and can get you throttled. Pick the longest interval that keeps the data fresh enough for its use.
Troubleshooting
The synchronisation runs but creates zero objects. Check the results position. If it does not point at the list of records in the response, OpenConnector finds nothing to process. Open the source endpoint in a browser and look at where the array sits: a bare top-level array is _root; a list wrapped in { "results": [...] } is results.
You run the synchronisation twice and get duplicate pets. Check the id position. Without a correct id field, OpenConnector cannot recognise a record it has already imported, so every run creates fresh copies. Point it at the field that uniquely identifies a record (here, id) and the second run updates or skips instead of duplicating.
A target field arrives empty. Check the mapping's Twig expression against the real shape of the source record. species comes from {{ category.name }}, not {{ species }}, because the source nests the category — use the mapping's live preview or Test dialog against a real record to catch this before you run.
Test yourself
You have pulled the data in if all of these are true:
- A source named
Swagger Pet Store (Academy)exists with locationhttps://petstore.swagger.io/v2, typeapi, and its connection has been tested. - The Pet to pet mapping reshapes a Swagger pet to
{ name, species, status }, withspeciescoming from{{ category.name }}and pass-through off, confirmed in the Test dialog. - The synchronisation ties the source, the endpoint
/pet/findByStatus?status=available, results position_root, id positionid, thePet to petmapping, and thepetstore-academy/pet-academytarget together. - Running it created pets in the register, visible in OpenRegister's Search / views alongside the Part 1 pets.
- You understand that a schedule turns the run into a background job, and that the id position makes re-runs deduplicate — create, update, skip — instead of duplicating.
Where to go from here
Your register now fills itself from an external API, on a schedule, without code. The last part of the chain takes that register public.